Basic TranSPHIRE setup
The following instructions are suppose to run only once at the very beginning after installation of TranSPHIRE.
Command line arguments
TranSPHIRE offers some command line arguments that control its basic behaviour.
Most of the command line arguments can additionally be controlled by environmental variables.
This is especially useful if TranSPHIRE is used in an environmental module environment.
Commmandline options / Environmental variable |
Description | Default value |
|---|---|---|
--root_directory TRANSPHIRE_ROOT_DIRECTORY |
TranSPHIRE root directory. This is the directory where TranSPHIRE will be started. Every provided relative directory and file path will be respective to this directory. |
The users home directory. |
--settings_directory TRANSPHIRE_SETTINGS_DIRECTORY |
TranSPHIRE settings directory. This is the directory where the settings and templates are stored. |
transphire_settings in the root_directory |
--mount_directory TRANSPHIRE_MOUNT_DIRECTORY |
TranSPHIRE mount directory. In case users need to mount pre-defined mount points themselves, those are located in this directory. |
transphire_mounts in the root_directory |
--font TRANSPHIRE_FONT_SIZE |
Font size to use within the TranSPHIRE GUI. Most widgets are scaled accordingly. |
5 or read from settings if not provided. |
--adjust_width TRANSPHIRE_ADJUST_WIDTH |
Scaling factor for the widget width. >1 will make the widgets larger; <1 will make the widgets smaller. |
1 or read from settings if not provided. |
--adjust_height TRANSPHIRE_ADJUST_HEIGHT |
Scaling factor for the widget width. >1 will make the widgets larger; <1 will make the widgets smaller. |
1 or read from settings if not provided. |
--n_feedbacks TRANSPHIRE_N_FEEDBACKS |
Maximum number of allowed feedbacks. | 10 |
| --edit_settings | Open the “Default settings” dialog. | – |
| --version | Show version information. | – |
| --kill | Kill open, dead or stalling TranSPHIRE runs. |
– |
Basic setup and templates
It is possible to setup default settings and templates for the TranSPHIRE pipeline. To enter the setup area type:
>>> transphire --edit_settings
And the GUI will open:
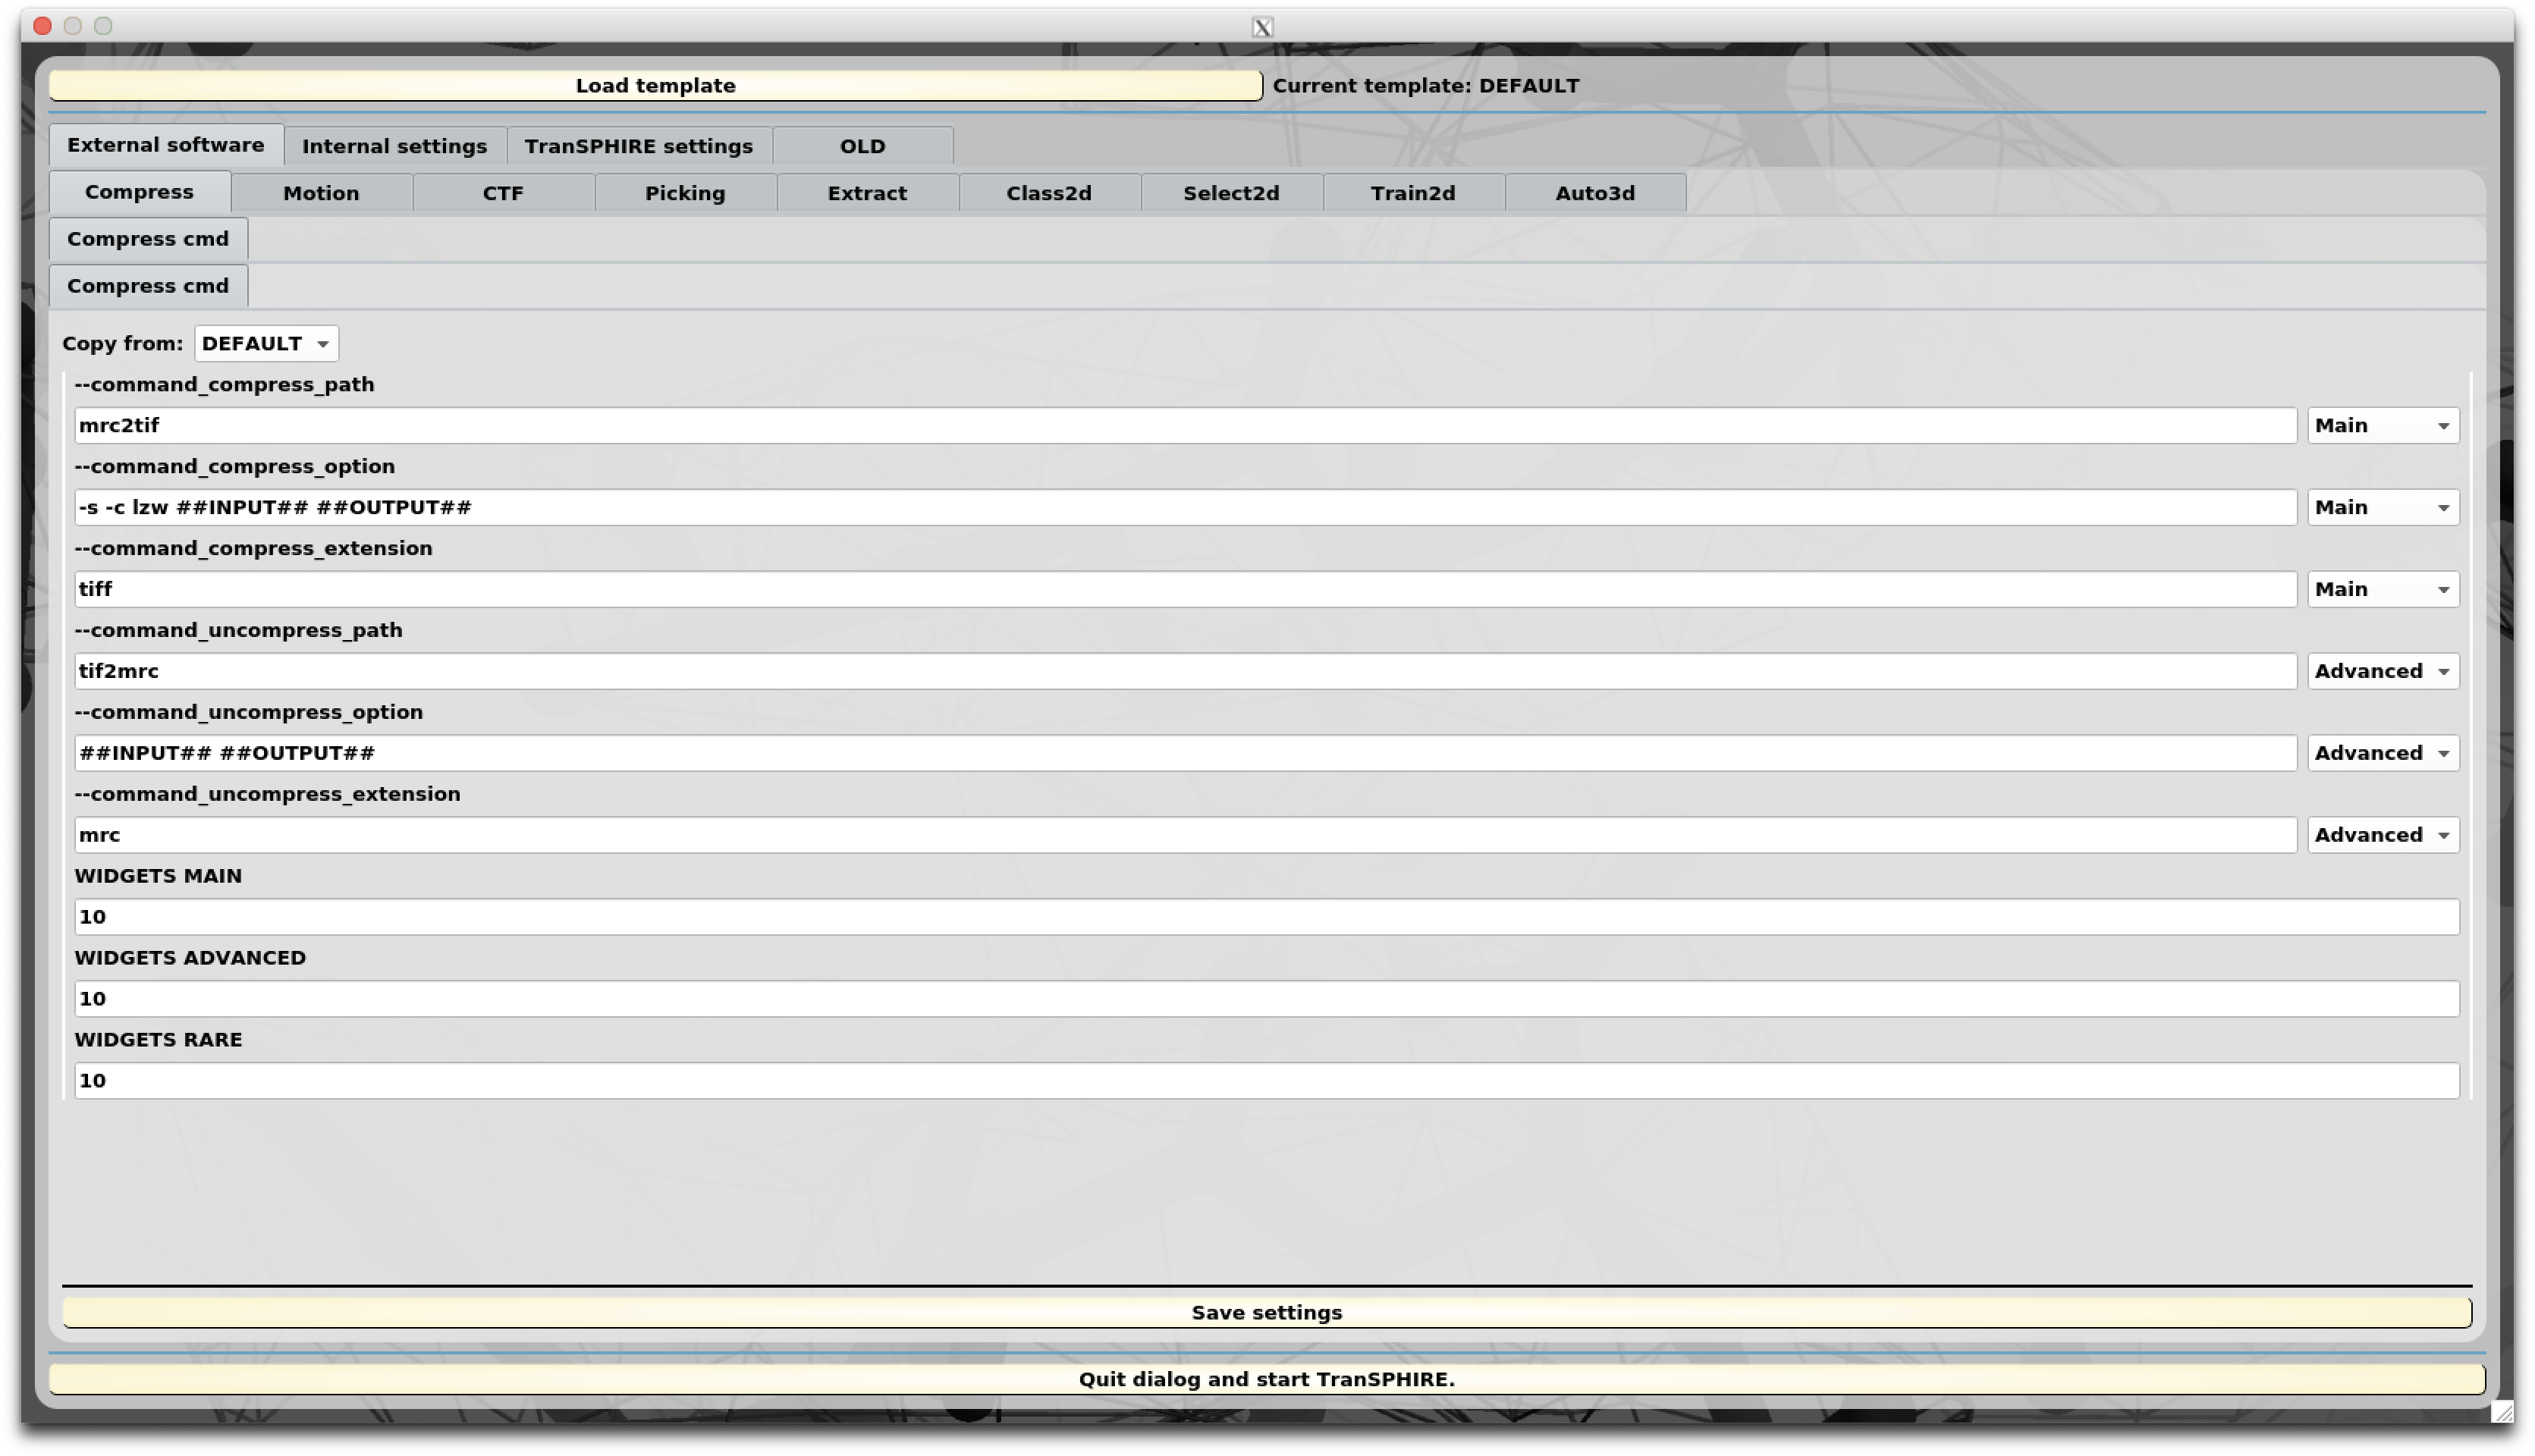
The first level Tab bar groups the different settings.
Settings affected by templates
- External software: Contains all settings related for the software packages used for processing.
- Internal settings: Settings related to the TranSPHIRE pipeline itself.
Settings shared throughout templates
- TranSPHIRE settings: Settings that should be available to every template.
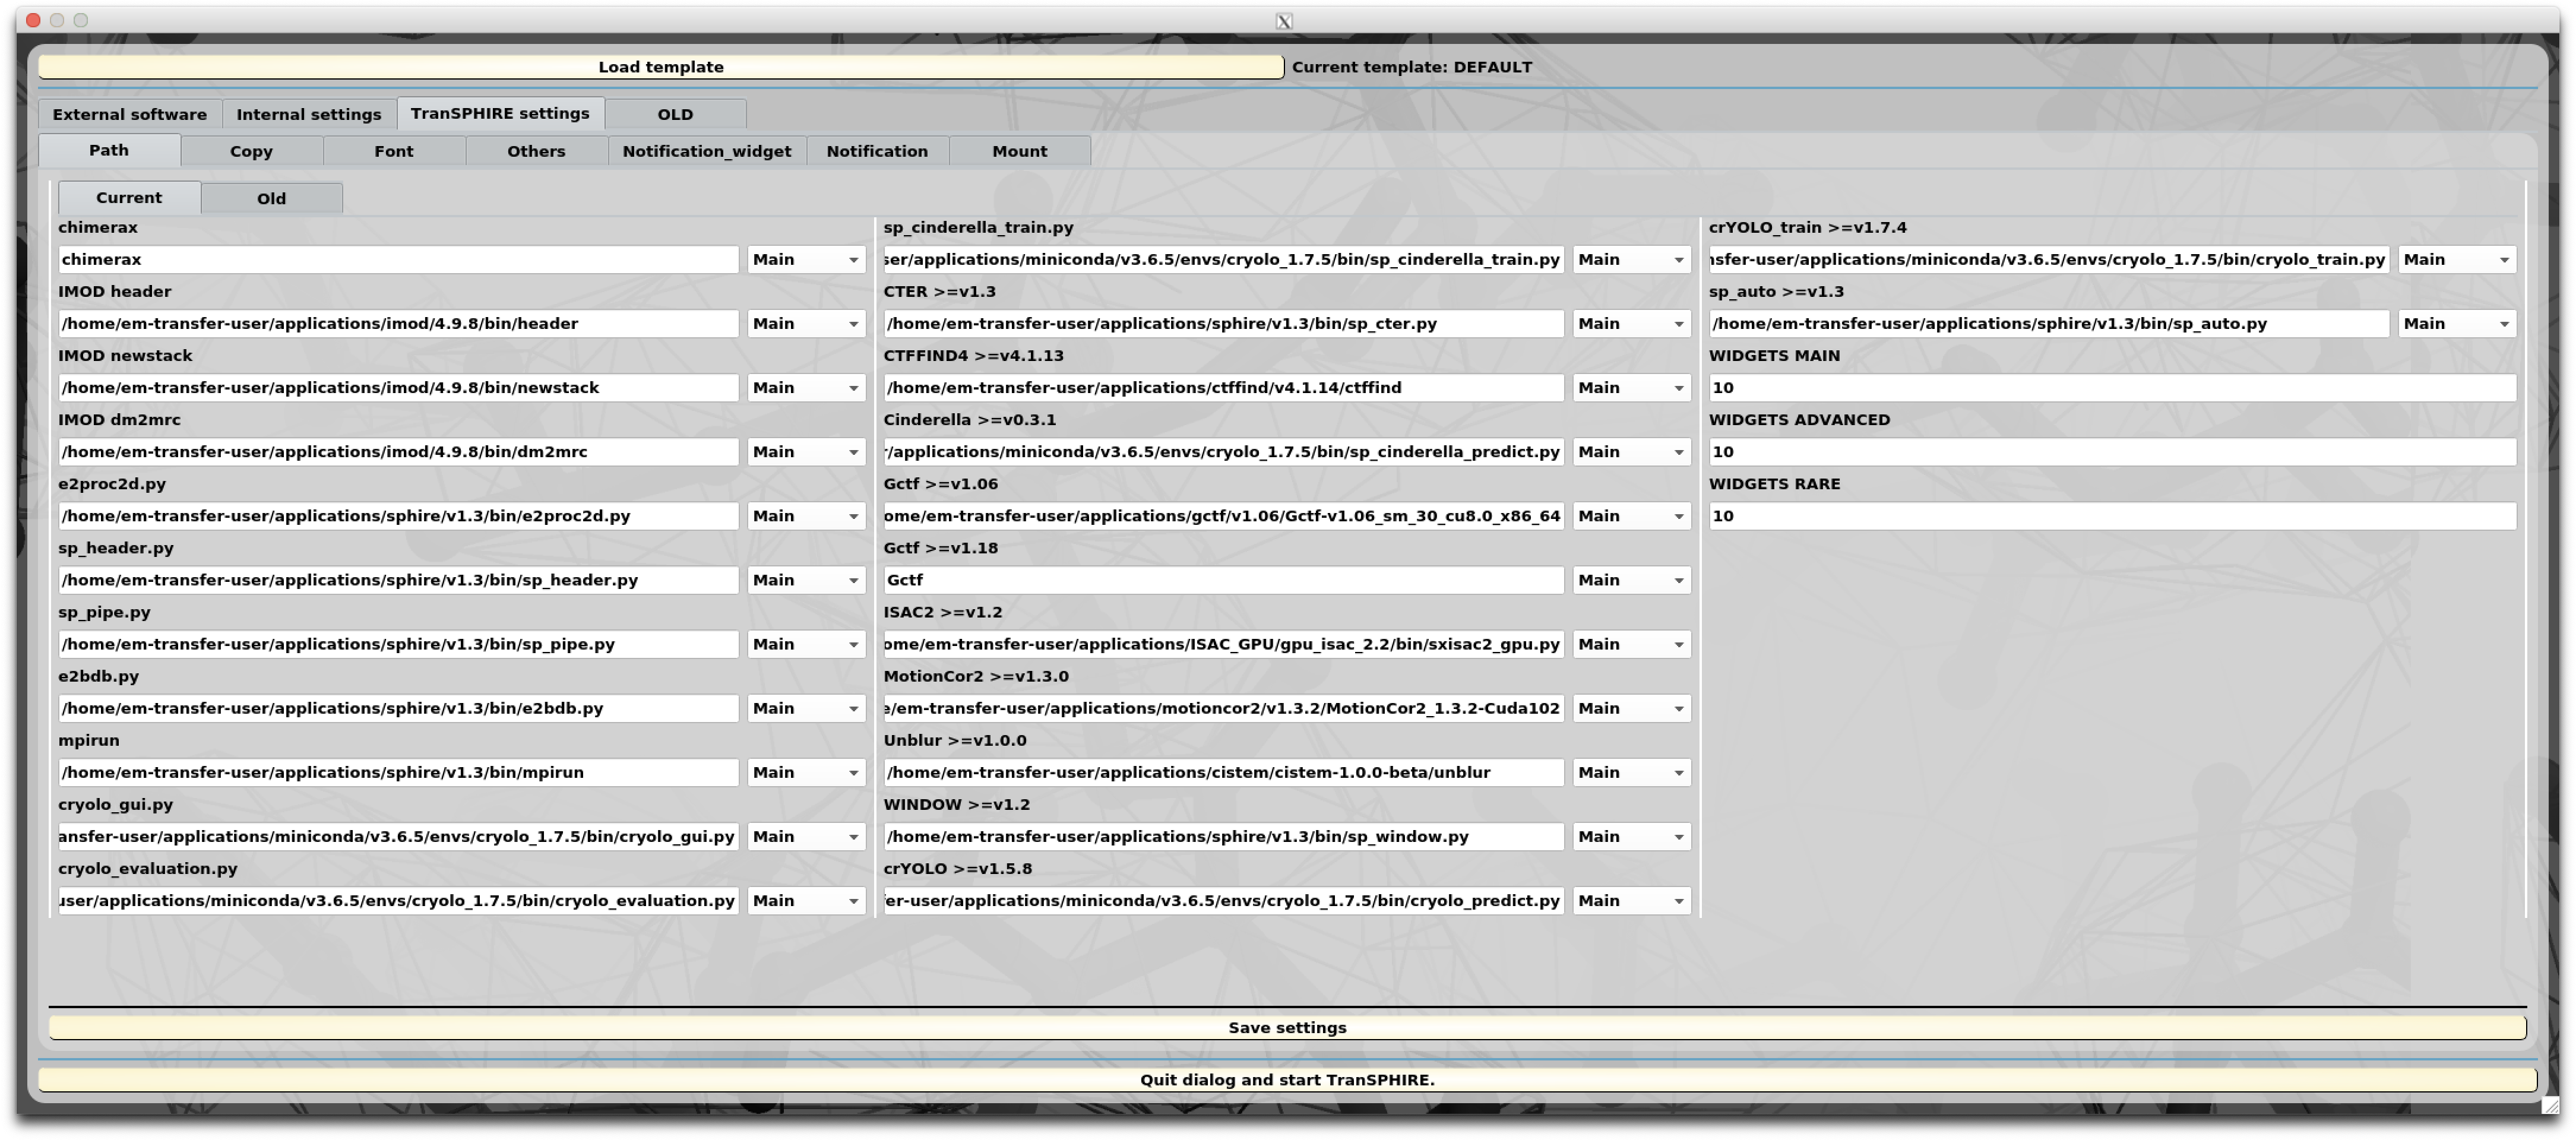
Program paths
Click on TranSPHIRE settings -> Path -> Current.
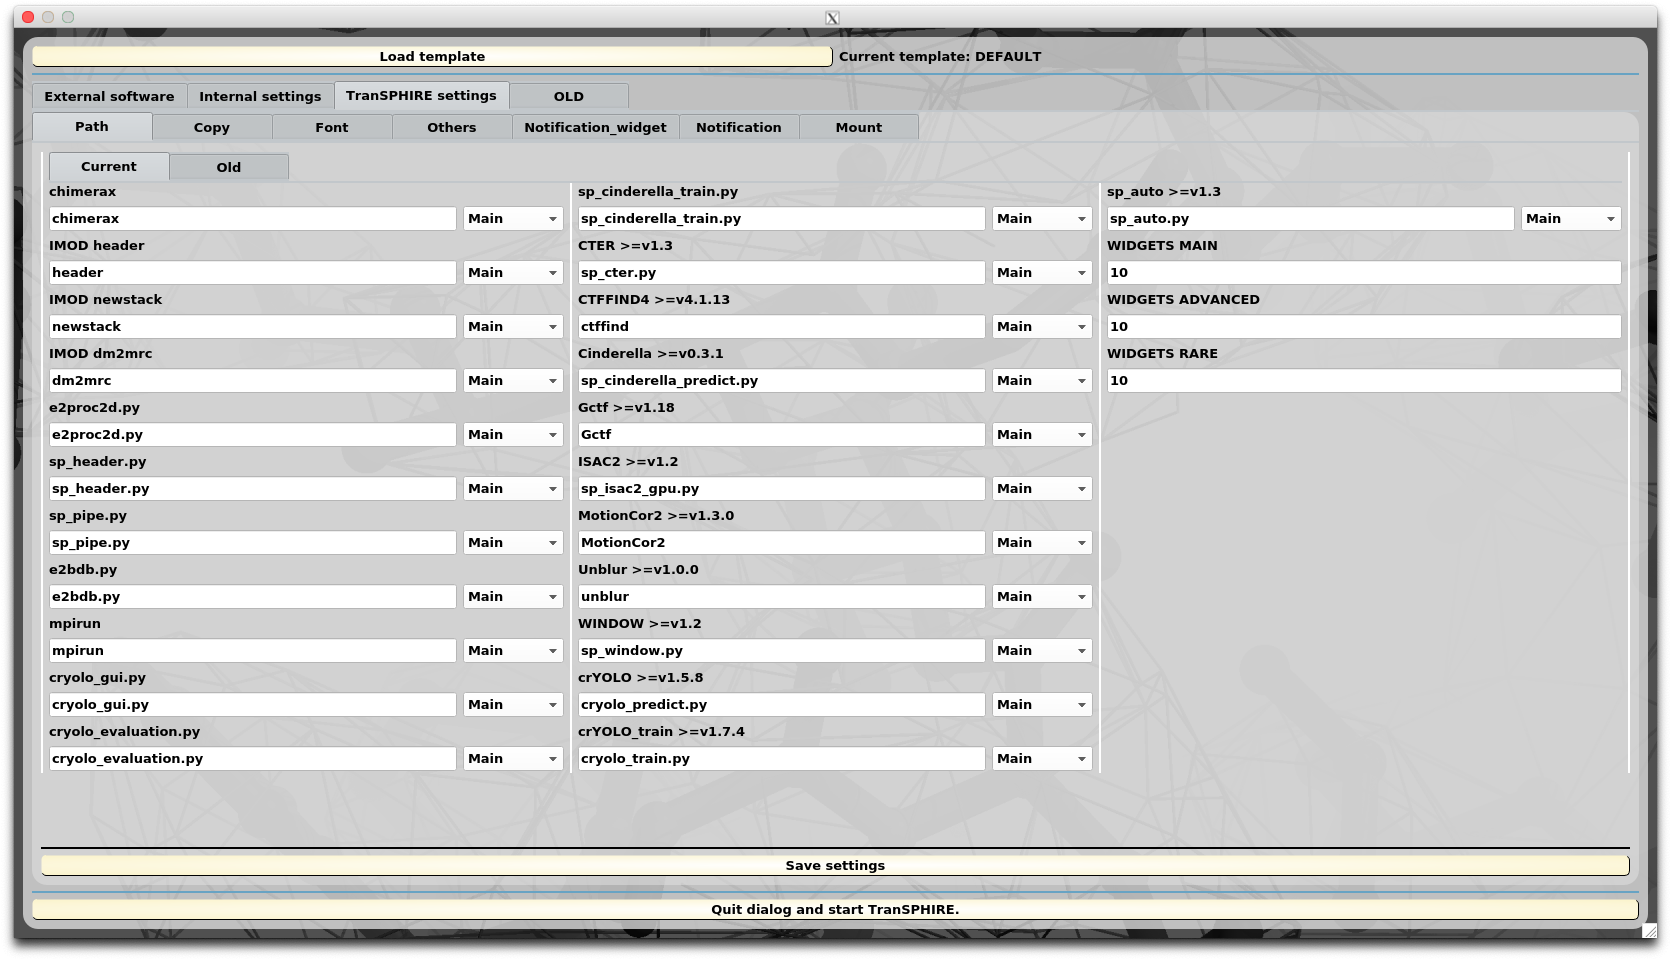
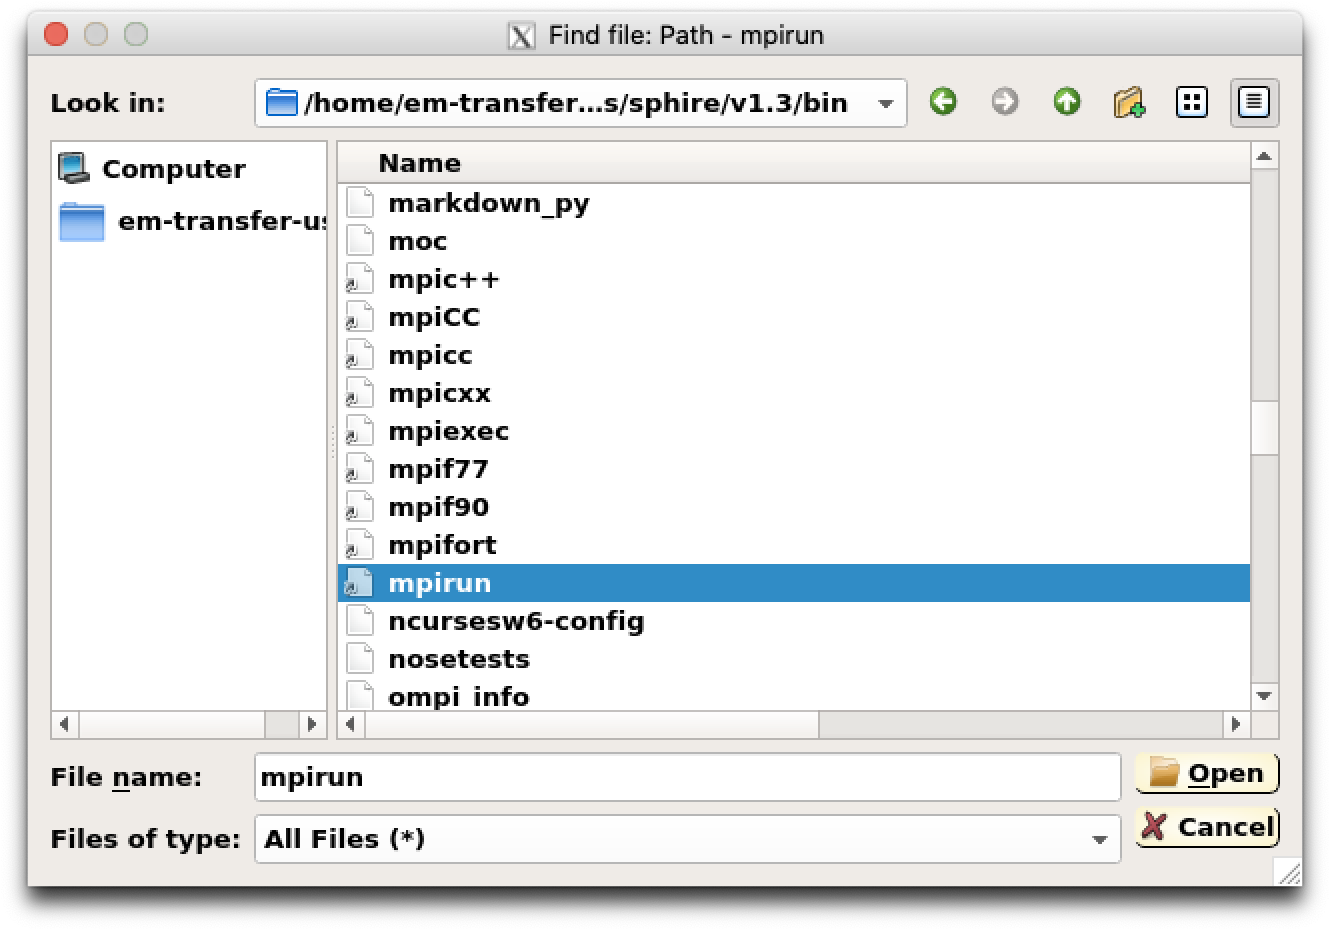
Provide the full PATH to the executables. You can press Ctrl + Return while editing to open a File Open Dialog. If you are not sure where the files are located, but you can execute them in the terminal type:
>>> which desired_command
Otherwise contact your system administrator.
Note
Please provide the mpirun command that is shipped with the SPHIRE installation.
After the information has been provided, click the Save settings button.
Mount points
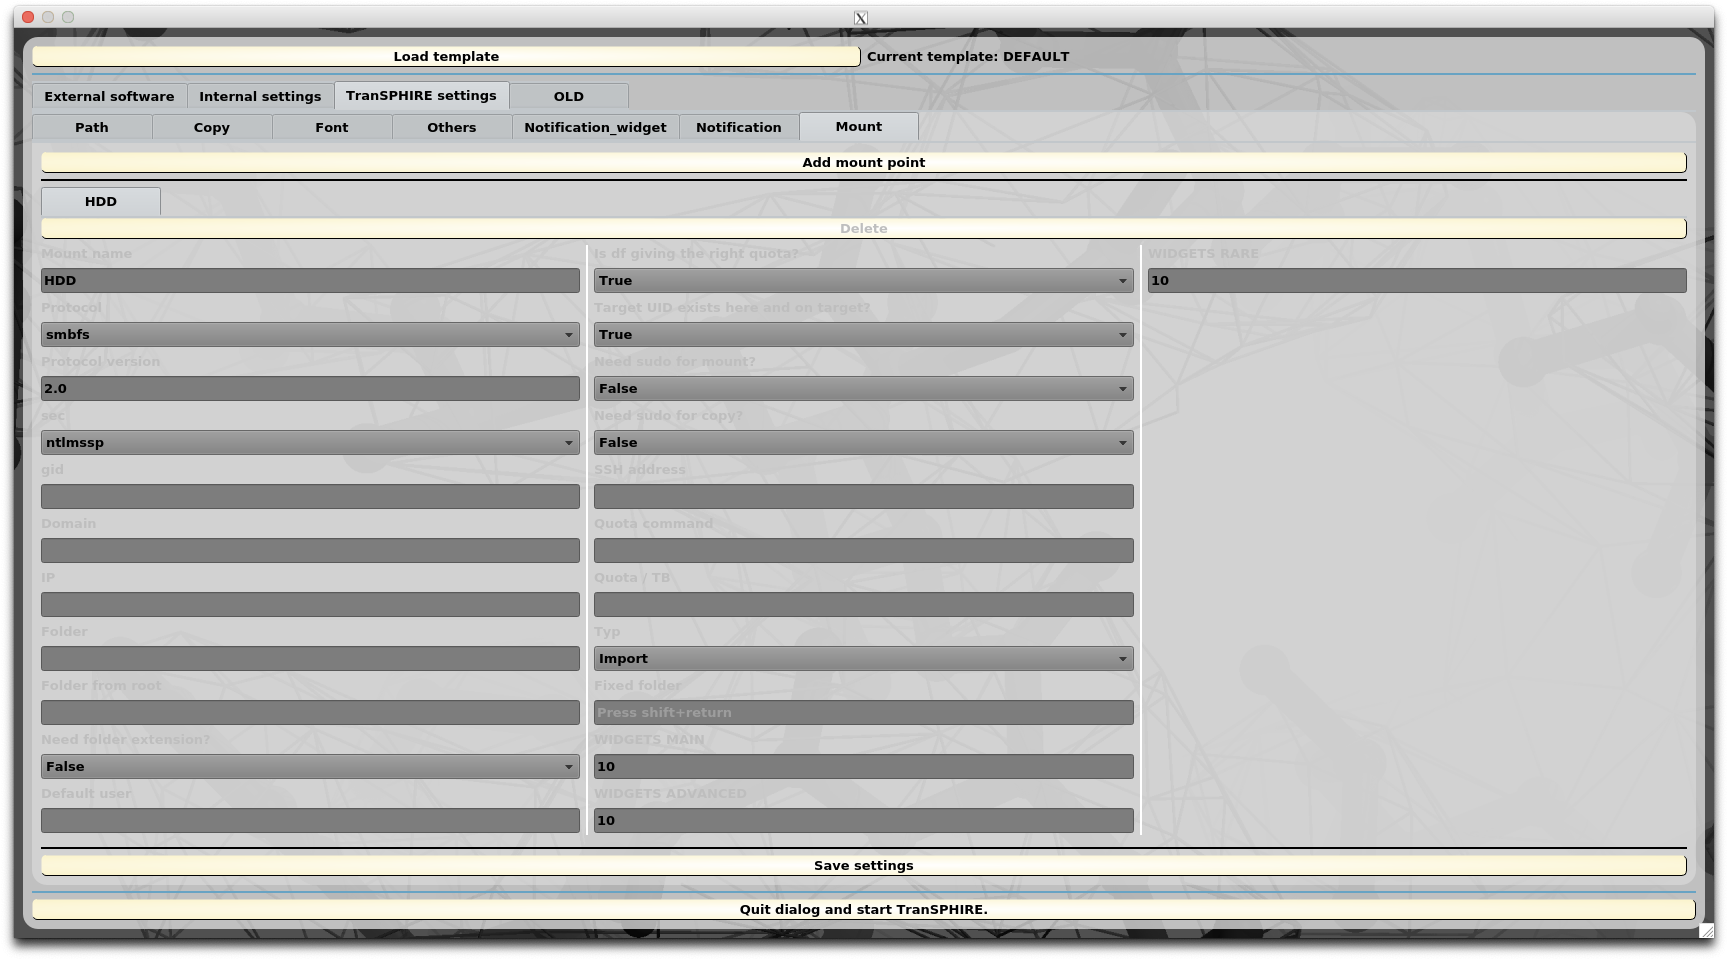
Next provide the mount point information to tell TranSPHIRE where possible data is located or where to copy created data to. Click on TranSPHIRE settings -> Mount. By default there is a mount point for external hard drives present, but additional mount points need to be added in order to function properly. To mount external Machines, Linux mount.mount_protocol executables are used.
There are two possible ways to deal with mount points: Fixed folder mount points and On demand mount points.
Fixed folder mount points
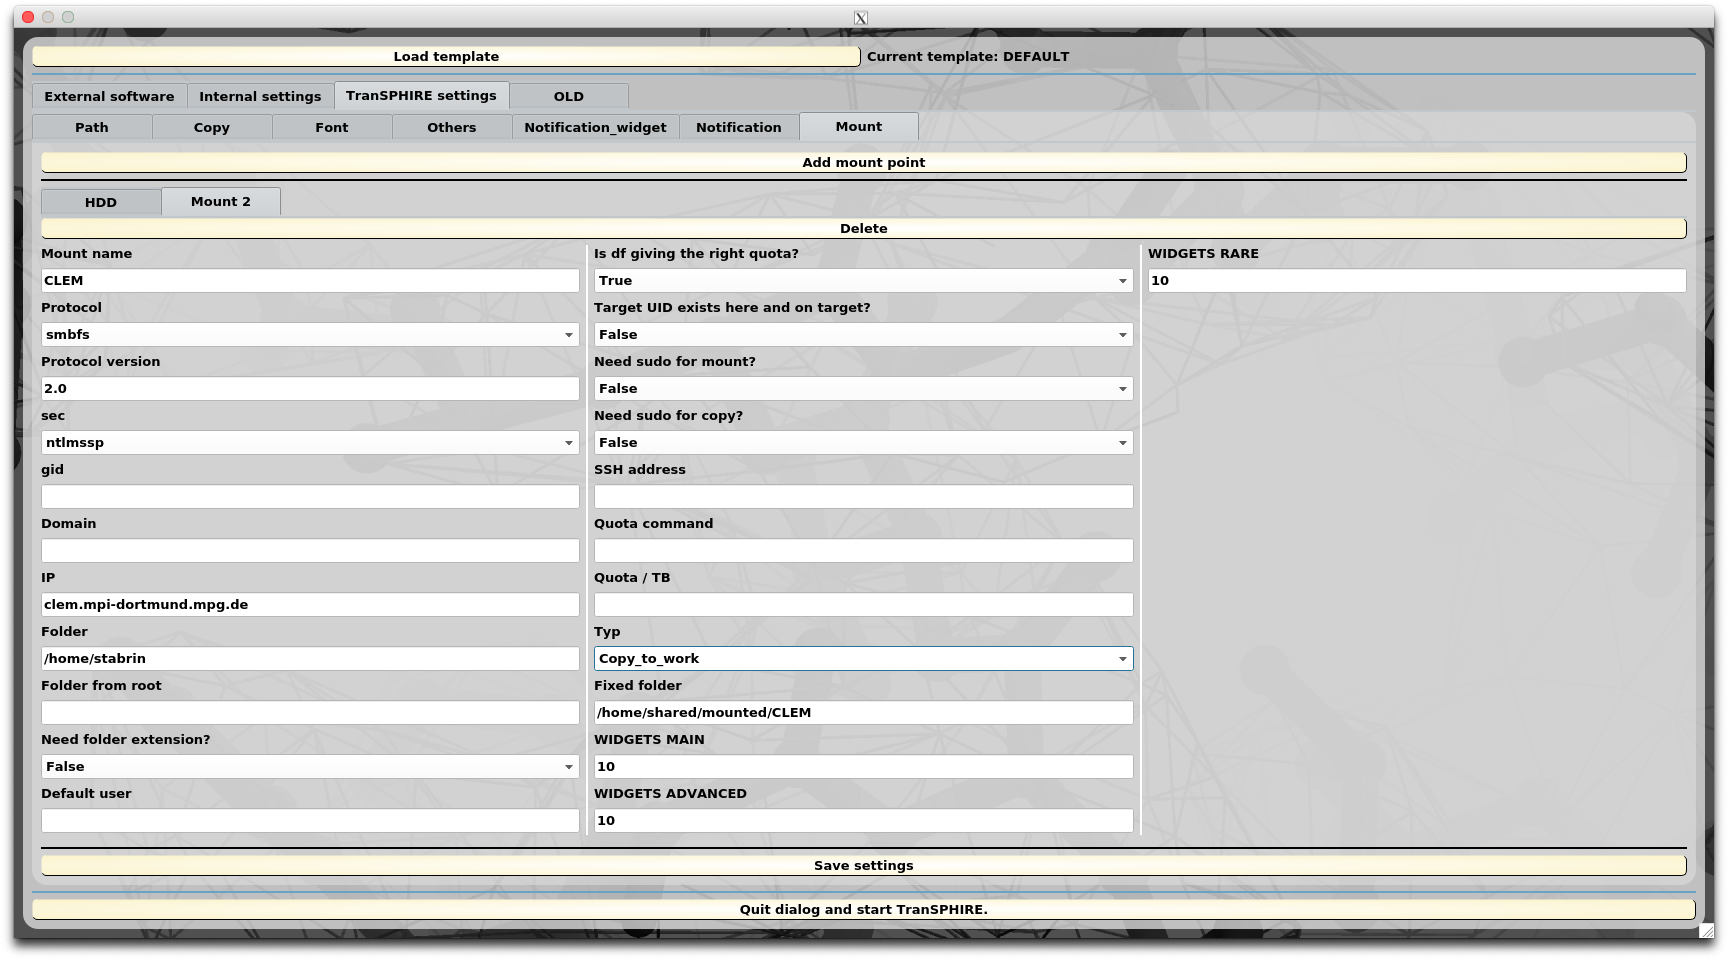
Click on the Add mount point button and a new mount point entry Mount 2 appears.
You need to provide the following entries:
- Mount name
- Name of the mount point within the TranSPHIRE GUI.
- IP
- IP adress of the remote device. This is necessary to assure the correct execution of the Auto3D command via SSH.
- Folder
- Mount entry folder name of the remote device.
- Typ
- Choose if the mount point is used to import the data or if it is a destination for either processing or backup.
- Fixed folder
- Folder of the fixed mount point on the local device.
Note
Our cluster is called CLEM and is mounted on the local device at the location /home/shared/mounted/CLEM.
The IP is clem.mpi-dortmund.mpg.de and the mounted folder is /home/stabrin.
Because it is a cluster for data processing, the Typ is Copy_to_work.
The Fixed folder location is /home/shared/mounted/CLEM.
Therefore our configuration is:
- Mount name: CLEM
- IP: clem.mpi-dortmund.mpg.de
- Folder: /home/stabrin
- Typ: Copy_to_work
- Fixed folder: /home/shared/mounted/CLEM
On demand mount points
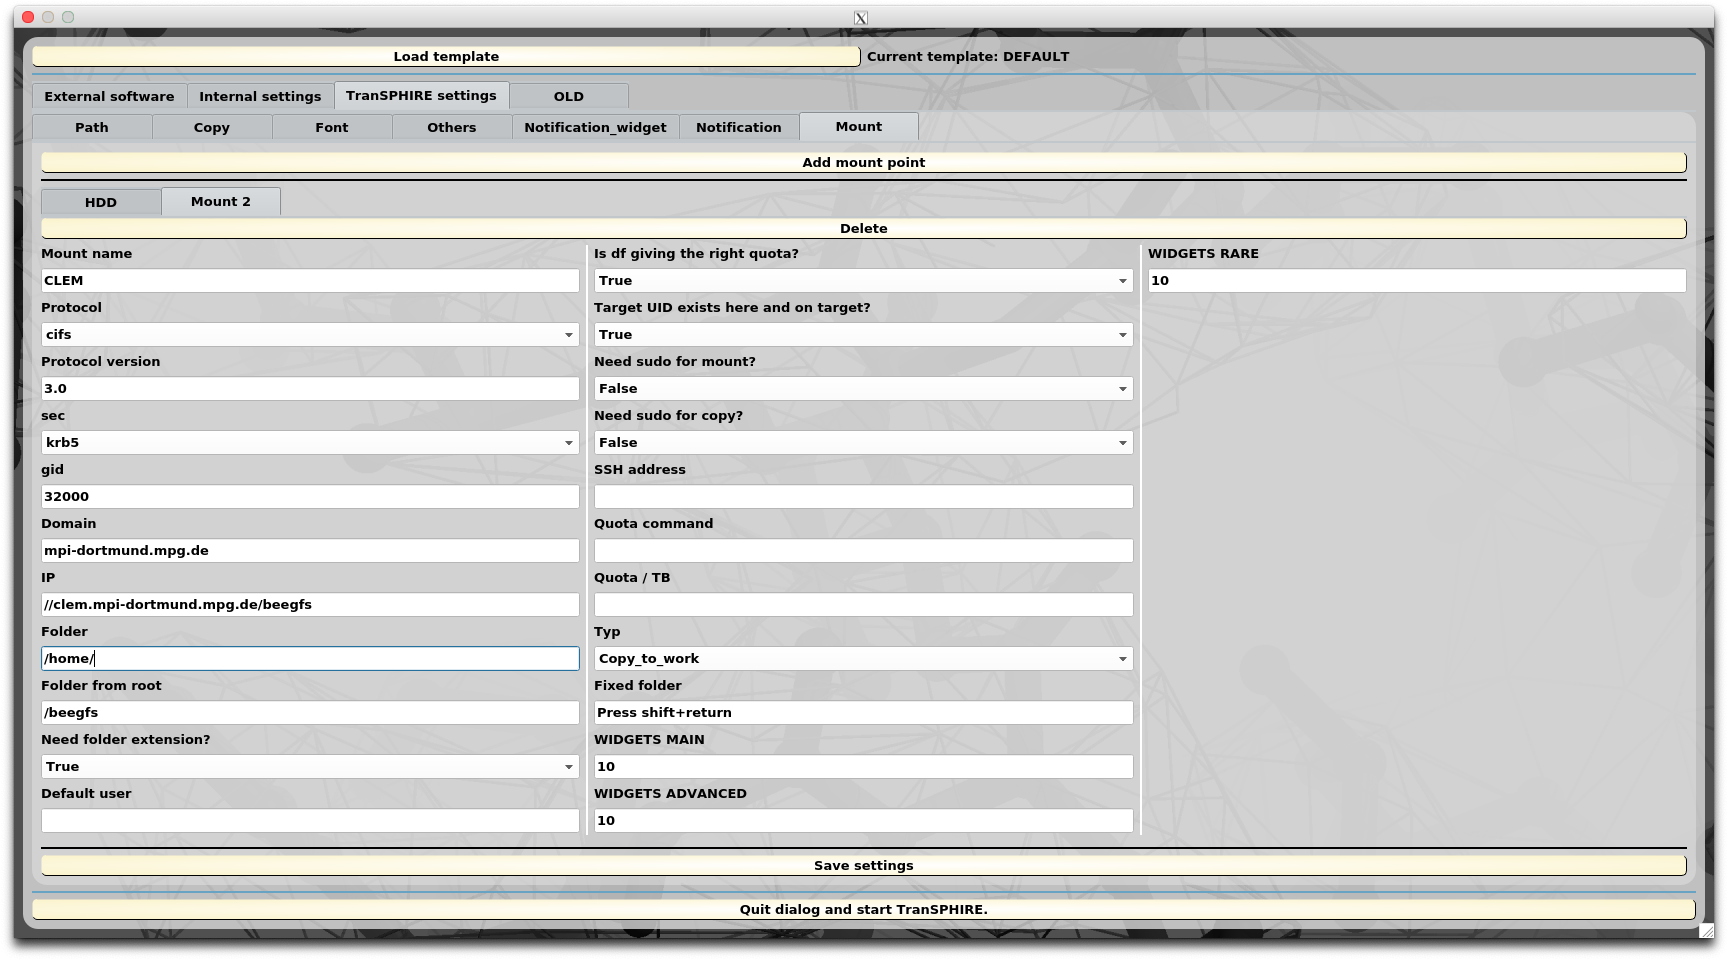
Click on the Add mount point button and a new mount point entry Mount 2 appears.
To fill out the respective entries, you should talk to your system administrator.
You need to provide the following entries:
- Mount name
- Name of the mount point within the TranSPHIRE GUI.
- Protocol
- Mount protocol.
- Protocol version
- The version of the protocol.
- sec
- The security protocol used for the mount point. If your
secvalue iskrb5, the cruid option is automatically set to the user. If you need a different behaviour, please contact markus.stabrin@mpi-dortmund.mpg.de.
- The security protocol used for the mount point. If your
- gid
- The mount group.
- Domain
- Domain of the mount point.
- IP
- IP adress of the remote device. This is necessary to assure the correct execution of the Auto3D command via SSH.
- Folder
- Mount entry folder name of the remote device.
- Folder from root
- Path to the folder specified in
Folderfrom the root directory of the remote device.
- Path to the folder specified in
- Need folder extension?
- Set to True, to allow dynamic point entries. See the note for an example.
- Default user
- Default user to fill in for mounting. This way only the password needs to be provided. Useful for computers where the mount user does not change.
- Is df giving the right quota?
- The Linux command
dfprovides information about the disc occupancy of mount points. However, for file systems that use a quota management this value is usually not correct. If in doubt, leave the settings toTrue.
- The Linux command
- Target UID exists here and on target?
- For domain user managed computers.
If set to
True, the provided user/password combination will be used to run anlscommand on the local machine to provide a sanity check.
- For domain user managed computers.
If set to
- Need sudo for mount?
- WARNING: Providing root passwords is not ideal.
We would recommended to use
cifsmount points and allow for password-less sudo rights formount.cifs.
- WARNING: Providing root passwords is not ideal.
We would recommended to use
- Need sudo for copy?
- WARNING: Use this with caution, a shared account for the TranSPHIRE runs is not recommended. If you use a shared “Transfer” account for the dedicated TranSPHIRE machine, the root password needs to be provided at the beginning of the session to allow for copy of the data to the mount points.
- SSH address
- SSH address used to calculate the quota if
Is df giving the right quotais set to False.
- SSH address used to calculate the quota if
- Quota command
- Command to calculate the quota on the remote device.
- Quota / TB
- Deprecated will be removed in the next versions.
- Typ
- Choose if the mount point is used to import the data or if it is a destination for either processing or backup.
- Fixed folder
- Folder of the fixed mount point on the local device.
Note
The current user is stabrin and the authentification mechanism works with a kerberos ticket.
Our cluster is called CLEM.
The mount protocol is cifs and the version is 3.0.
The sec protocol is krb5.
stabrin is a member of the group 32000 ad the domain is mpi-dortmund.mpg.de.
The mount IP entry point is //clem.mpi-dortmund.mpg.de/beegfs and the mount folder is /home/.
The path from root to the mount folder is /beegfs resulting in /beegfs/home/ on the remote device.
Since every user has its own separate home directory on CLEM and we want to allow for dynamic mounting, we have Need folder extension? set to True.
This way we can provide stabrin as the folder extension during mounting to mount /beegfs/home/stabrin.
Additionally, the Target UID exists here and on target and we change the setting to False as well as the Typ to Copy_to_work.
Therefore our configuration is:
Create templates
In order to create setting templates you need to click the Load template button.

- Drop-down widget: You can choose the template here.
- New template: You can create a new and empty template entry.
- Copy current template: Create a new template, but the settings are identical to the template chosen in the drop-down widget.
- Remove current template: Remove the currently selected template.
- Choose current template: Choose the current template in order to change its settings.
Click on New template and provide a name like Tutorial_template for your new template and set Choose current template.
The text next to the Load template button indicates that the correct template is active.

Now adjust the settings to match the needs for your facility. This helps especially beginner users to avoid making errors during setup.